UITableViewController by example
October 18, 2010
Please note, this article is aimed at Monotouch development on the iPhone
This article focuses on XIB-free UITableViewControllers. The entire article focuses on adding controllers and views programatically and is completely Interface Builder free. All of the code samples below are packaged together in a sample solution in the download above, and the following tasks are covered:
- UITableViewDataSource and UITableViewDelegate
- Creating a Settings view with a UITableViewController and Checkmarks
- The various inbuilt styling capabilities of the UIKit tables
- Sections
- The basics of making tables editable so you can delete and re-order rows.
Housing inside a UINavigationController
It’s worth reading the UINavigationController by example article first if you’re not familiar with UINavigationControllers, as the example UITableViewControllers in this article sit inside a UINavigationController so we can navigate back and forth. This navigation controller is wired up in the AppDelegate class:
public partial class AppDelegate : UIApplicationDelegate
{
	private MyTableController controller;
	public override bool FinishedLaunching (UIApplication app, NSDictionary options)
	{
		controller = new MyTableController();
		window.AddSubview (controller.View);
		window.MakeKeyAndVisible ();
		return true;
	}

	// This method is required in iPhoneOS 3.0
	public override void OnActivated (UIApplication application)
	{
	}
}
The basics
A video showing the solution download in action
Ignoring custom-painted views and games, tables are the commonest technique for displaying data in iPhone apps. Apple have made them simple to use and implement and the they’re even easier in Monotouch. Unlike HTML tables or winforms datatables, they are not excel-like with their columns. You are given around 3 columns to present your data with which makes things a lot simpler to program for.
To get started, you simply derive a new class from UITableViewController and overide the ViewDidLoad or ViewDidAppear methods (this will help you decide which one). From here you are given a TableView property. This is the table the controller uses as its view. You have probably already read tutorials on UITableViews and UITableViewControllers and discovered that, unlike the Microsoft .NET way of serving up data in tabular form (ASP.NET or winforms version), databinding and events are slightly more code-heavy.
The anti-pattern of this code heavy way of doing things are what .NET delegates were designed to improve upon: repetitive subclassing for events and datasources. If you’ve ever used Java Swing you’ll be use to the same kind of thing with the MouseListener/MouseWatcher classes. As you’re coding with a framework designed for Objective-C, the objective-C equivalent is not as verbose as the C# equivalent.
Each TableController’s TableView property needs to have a delegate class - a class that inherits from UITableViewDelegate and handles events such as rows being selected. It also needs a datasource class which inherits from UITableViewDataSource and is responsible for providing the data to display.
public class MainTableController : UITableViewController
{
	// Allow us to set the style of the TableView
	public MainTableController(UITableViewStyle style) : base(style)
	{
	}

	public override void ViewDidLoad ()
	{
		TableView.DataSource = new MainTableDataSource();
		TableView.Delegate = new MainTableDelegate(this);
		base.ViewDidLoad ();
	}
}
UITableViewDelegate
The code below shows a basic example of implementing a class derived from UITableViewDelegate.
The examples in this article use a UITableViewDataSource and UITableViewDelegate, however it is possible to reduce your lines of code by simply subclassing a UITableViewSource which combines the two classes.
The UITableViewDelegate you derive from gives you a number of methods that are fired after certain events. The most common one you’ll override is the RowSelected event, which is where you decide what you want to do when each separate row is selected - typically pushing another table or non-table based controller into view or toggling some kind of state. In the example below we push a new TableView controller based on the row.
public class MainTableDelegate : UITableViewDelegate
{
	private MainTableController _controller;
	public MainTableDelegate(MainTableController controller)
	{
		_controller = controller;
	}

	public override void RowSelected (UITableView tableView, NSIndexPath indexPath)
	{
		UITableViewController nextController = null;

		switch (indexPath.Row)
		{
			case 0:
				nextController = new CheckmarkDemoTableController(UITableViewStyle.Grouped);
				break;
			case 1:
				nextController = new StyleDemoTableController(UITableViewStyle.Grouped);
				break;
			case 2:
				nextController = new EditableTableController(UITableViewStyle.Plain);
				break;
			default:
				break;
		}

		if (nextController != null)
			_controller.NavigationController.PushViewController(nextController,true);
	}
}
UITableViewDataSource
Unlike .NET controls that have a datasource property, you need to subclass UITableViewDataSource for the data you display in your table, you can’t just pass it an IList or IListSource. You gain greater control of each table row this way, however does take more lines of code to get the result.
The two methods you need to override in UITableViewDataSource are RowsInSection and GetCell. If you have sections it’s slightly more complicated (more on this in the styling section of the article). The example below demonstrates a simple List-based datasource.
Where to you store the data - in the controller or the datasource is something that is open to debate. My view is that the datasource should have the responsibility for loading the data, however it is possible to store the data in the controller and then pass the controller into the datasource to reference it. If your delegate needs to reference the data then the controller makes sense or passing the UITableViewDataSource to the delegate.
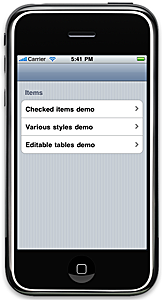
| public class MainTableDataSource : UITableViewDataSource | |
| { | |
| private List<string> _items; | |
| private string _section1CellId; | |
| public MainTableDataSource() | |
| { | |
| _section1CellId = "cellid"; | |
| _items = new List<string>() | |
| { | |
| "Checked items demo", | |
| "Various styles demo", | |
| "Editable tables demo" | |
| }; | |
| } | |
| public override string TitleForHeader(UITableView tableView, int section) | |
| { | |
| return "Items"; | |
| } | |
| public override int RowsInSection(UITableView tableview, int section) | |
| { | |
| return _items.Count; | |
| } | |
| public override UITableViewCell GetCell(UITableView tableView, NSIndexPath indexPath) | |
| { | |
| // For more information on why this is necessary, see the Apple docs | |
| var row = indexPath.Row; | |
| UITableViewCell cell = tableView.DequeueReusableCell(_section1CellId); | |
| if (cell == null) | |
| { | |
| // See the styles demo for different UITableViewCellAccessory | |
| cell = new UITableViewCell(UITableViewCellStyle.Default, _section1CellId); | |
| cell.Accessory = UITableViewCellAccessory.DisclosureIndicator; | |
| } | |
| cell.TextLabel.Text = _items[indexPath.Row]; | |
| return cell; | |
| } | |
| } |
Creating a Settings view with a UITableViewController and Checkmarks
Almost every app on the iPhone has some form of settings view, and these are usually represented by UITableViewController, using the UITableViewStyle.Grouped enum. You can do this in the constructor of your subclassed UITableViewController:
public class MySettingsTableController : UITableViewController
{
	public CheckmarkDemoTableController() : base(UITableViewStyle.Grouped)
	{
	}
}
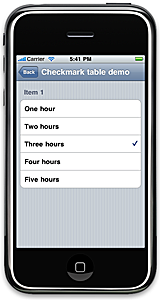
Originally I intended to write about using checkmarks in tables (checkmarks are equivalent to radio boxes but can also be multi-select), however it seems that using Miguel De Icaza‘s MonoTouch.Dialog class is a far easier solution than writing datasource class after datasource class for what should be a fairly simple task. There’s a full usage example here - make sure you use the Fetch method. I’ve left my checkmark example in the download solution if the MonoTouch.Dialog doesn’t do what you want.
Styling options available for UITableViewControllers
The downloadable solution contains a demonstration of styling rows and cells for a table controller. Styling is done inside your datasource class, in the GetCell() method. The UITableViewCell holds the styling options via its constructor:
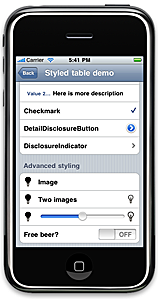
- UITableViewCellStyle.Default
- UITableViewCellStyle.Subtitle
- UITableViewCellStyle.Value1
- UITableViewCellStyle.Value2
And its primary styling properties:
- UITableViewCell.TextLabel (primarily UITableViewCell.TextLabel.Text)
- UITableViewCell.Accessory - the right side icon/button
- UITableViewCell.AccessoryView - allows you customise the right side icon/button
- UITableViewCell.DetailTextLabel - the text underneath the cell’s title
- UITableViewCell.ImageView - the left side image of the cell
- UITableViewCell.ContentView - the central area allowing to embed controls/views.
The “accessory” types (the button or item found on the right hand side):
- UITableViewCellAccessory.None (and using theAccessoryView` property)
- UITableViewCellAccessory.Checkmark
- UITableViewCellAccessory.DetailDisclosureButton
- UITableViewCellAccessory.DisclosureIndicator
You can also use the AccessoryForRow method in the UITableViewDataSource to lay out your accessory.
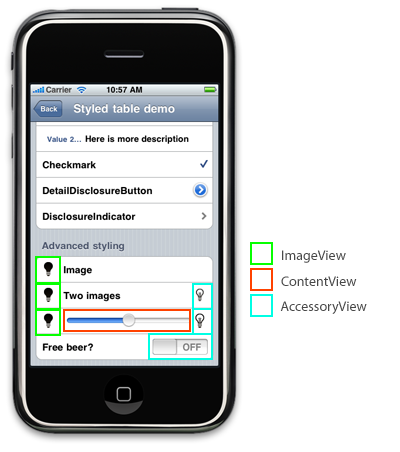
You’re given 3 Views to play with on each row:
- UITableViewCell.BackgroundView - An background view for the cell (an image using a UIImageView for example).
- UITableViewCell.AccessoryView - the far right button/icon.
- UITableViewCell.ContentView - the middle area.
- UITableViewCell.ImageView - the left hand side image area.
The graphics below demonstrate these settings. As you can see laying out a table row is fairly flexible however you’re only essentially given a maximum of 3 columns. You can do a fair amount of customisation with the ContentView property.
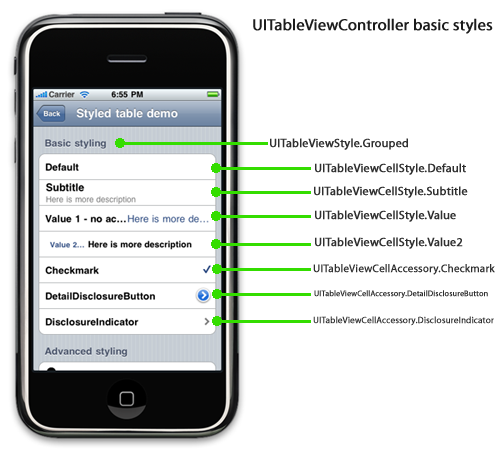
In the demo solution I’ve wrapped styling metadata information in a StyleItem class. Each datasource item is a StyleItem class which tells the GetCell method what to do with it. This is there for purpose of demo’ing the capabilities of tables, in reality you’ll rarely have to do this as each cell will generally be consistent in style.
Sections
One nice feature that the UITableViewDataSource gives you is the ability to break your rows up into sections. The styling options above show you how to do this with one single datasource, but to section your code up you should ideally use two sources of data - for example two ILists, or a class to hold the title and the list of data for that section, as shown below. The download solution does it using the messier first technique of a single list, and basing the data on the row number.
Make sure the cellid is unique for each section or you will get some strange results with the table drawing/painting.
| public class MyDataSource : UITableViewDataSource | |
| { | |
| IList<SectionData> _data; | |
| private class SectionData | |
| { | |
| public string Title { get; set; } | |
| public string CellId { get; set; } | |
| public IList<string> Data { get; set; } | |
| public SectionData(string cellId) | |
| { | |
| Title = ""; | |
| CellId = cellId; | |
| Data = new List<string>(); | |
| } | |
| } | |
| public MyDataSource() | |
| { | |
| _data = new List<SectionData>(); | |
| SectionData section1 = new SectionData("section1"); | |
| section1.Data.Add("item 1"); | |
| section1.Data.Add("item 2"); | |
| section1.Data.Add("item 3"); | |
| section1.Title = "Basic"; | |
| _data.Add(section1); | |
| SectionData section2 = new SectionData("section2"); | |
| section2.Data.Add("option a"); | |
| section2.Data.Add("option b"); | |
| section2.Title = "Advanced"; | |
| _data.Add(section2); | |
| } | |
| public override string TitleForHeader(UITableView tableView, int section) | |
| { | |
| return _data[section].Title; | |
| } | |
| public override int RowsInSection(UITableView tableview, int section) | |
| { | |
| return _data[section].Data.Count; | |
| } | |
| public override int NumberOfSections(UITableView tableView) | |
| { | |
| return _data.Count; | |
| } | |
| public override UITableViewCell GetCell(UITableView tableView, NSIndexPath indexPath) | |
| { | |
| SectionData sectionData = _data[indexPath.Section]; | |
| string cellId = sectionData.CellId; | |
| string row = sectionData.Data[indexPath.Row]; | |
| UITableViewCell cell = tableView.DequeueReusableCell(cellId); | |
| if (cell == null) | |
| cell = new UITableViewCell(UITableViewCellStyle.Default, cellId); | |
| cell.TextLabel.Text = row; | |
| return cell; | |
| } | |
| } |
Making tables editable (deleting and moving rows)
The final part of the UITableViewController adventure demonstrates the inbuilt capabilites of UIKit for table editing, and how it works with MonoTouch. If you’re an objective-c and X-Code veteran (something I definitely am not), editing tables is like the rest of Monotouch - easy to transpose objective-c examples across.
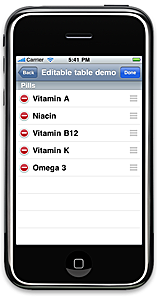
Editing is easily done with an IList datasource, you just add the methods below to your UITableViewDataSource class and the rest is inbuilt. The solution download is the same code but using a list of vitamins. As I point out in the code comments, the hard part of the move operation is moving the data around in your underlying datasource (for example doing a swap in SQL).
public override void CommitEditingStyle (UITableView tableView, UITableViewCellEditingStyle editingStyle, NSIndexPath indexPath)
{
	if (editingStyle == UITableViewCellEditingStyle.Delete)
	{
		_items.RemoveAt(indexPath.Row);
		tableView.DeleteRows(new [] { indexPath }, UITableViewRowAnimation.Fade);
	}
}

public override bool CanMoveRow (UITableView tableView, NSIndexPath indexPath)
{
	return true;
}

public override void MoveRow (UITableView tableView, NSIndexPath sourceIndexPath, NSIndexPath destinationIndexPath)
{
	// This is a basic example, with a database it'll be more tricky
	string item = _items[sourceIndexPath.Row];
	_items.RemoveAt(sourceIndexPath.Row);
	_items.Insert(destinationIndexPath.Row,item);
}

I'm Chris Small, a software engineer working in London. This is my tech blog. Find out more about me via Github, Stackoverflow, Resume