UINavigationController by example
September 12, 2010
Download all examples from Bitbucket
The basics
The UINavigationController gives you a one step-at-a-time (like an install wizard) navigation by using a stack of controllers. Microsoft were keen to introduce this in Vista with the control panel and the idea of back-forward buttons, and the UINavigationController isn’t much different.
The UINavigationController sits on the window and has an area to display each view/controller. From an ASP.NET MVC point of view it’s hard to tear yourself away from the idea that a controller has multiple actions, each potentially displaying a different view. In the iPhone and Cocoa Touch world each controller has one View only. It’s a 1-to-1 mapping. This View can itself contain views (Subviews), much like a control tree, or partial views in ASP.NET MVC.
So when I refer to controller I am also talking about the top level, container view.
UINavigationController has a Controllers property which is an array of the controllers it has displayed. The first item in the array is the first controller the UINavigationController displayed. Each controller is responsible for pushing the next controller that will be displayed after itself.
So the root controller inside a UINavigationController may contain a button. When clicked, the button will “push” the next controller to be displayed. The controllers you use inside the UINavigationController will typically be a UIViewController, or a UITableViewController.
The UIViewController hierarchy
The inheritence chain looks like this:
UIViewController
- UITableController
- UINavigationController
- UITabBarController
You can see that a UINavigationController infact inherits from UIViewController. The strange thing about this object model is the UIViewController has a property called NavigationController. So for OO purists this is a bit baffling that a parent class knows about its children. But moaning aside this is how it’s been done in UIKit. As you’ll find with a runtime error, you can’t place a UINavigationController inside a UINavigationController
Whenever you push a controller, it can access the parent UINavigationController it may or may not belong to via the NavigationController property. The property is null if the controller is not inside a UINavigationController.
Going completely XIB-less
This and the accompanying 2 articles are Interface builder and NIB/XIB-free, however your iPhone project is always created with one XIB in the project - MainWindow.xib. This contains a reference to you parent UIWindow that the application is contained in, much like the first form in a winforms application.
You can delete this XIB file if you want (it may also marginally improve performance) and create the window manually. Your AppDelegate class no longer needs to be partial as the designer file is gone too:
public class Application
{
	static void Main(string[] args)
	{
		// Make sure you use this overload
		UIApplication.Main(args, null, "AppDelegate");
	}
}

[Register("AppDelegate")]
public class AppDelegate : UIApplicationDelegate
{
	private UIWindow window;
	private MyController controller;
	public override bool FinishedLaunching(UIApplication app, NSDictionary options)
	{
		var screenBounds = UIScreen.MainScreen.Bounds;
		controller = new MyController();
		window = new UIWindow(screenBounds);
		window.AddSubview(controller.View);
		window.MakeKeyAndVisible();
		return true;
	}
	// This method is required in iPhoneOS 3.0
	public override void OnActivated(UIApplication application)
	{
	}
}
Make sure you remove “Mainwindow.xib” from your project settings, ‘Main interface file’ option under the iPhone Application section.
However for the remainder of the article I’ll stick to the default Monotouch iPhone project way of having a partial designer class.
Adding a UINavigationController
If you create a new iPhone project in Monotouch, the first step to do is add a new class, and add your UINavigationController. Before you do anything, tell your main window that it should display your controller by adding two lines to the appdelegate class:
public partial class AppDelegate : UIApplicationDelegate
{
	private NavigationController controller;
	public override bool FinishedLaunching(UIApplication app, NSDictionary options)
	{
		controller = new NavigationController();
		window.AddSubview(controller.View);
		window.MakeKeyAndVisible();
		return true;
	}
	// This method is required in iPhoneOS 3.0
	public override void OnActivated(UIApplication application)
	{
	}
}
Make sure you don’t use local variables for Controller declarations. Whilst there are no problems with this when using the iPhone Simulator, you run the risk of getting runtime errors on the iPhone, as garbage collection is a lot stricter and intense. The iPhone Simulator will run your application using the familiar generation-based garbage collection mechanism. However on the iPhone you are running AOT (ahead of time) compiled C#, and your objects are dereferenced in a lot stricter manner. Much like in Winforms your controls all have a private member as a reference, in Monotouch the same thing is advisible for all controllers and views you reference in a controller.
One thing to note about the approach I’m taking in this article is I’m creating a new class for each controller I’m using. You don’t have to do it this way - you can simply create a new instance of UIViewController and add controls and layout code to this inside your UINavigationController. However with this approach you get one large monolithic class that performs all layout. By creating separate classes for each controller, you separate responsibilities a lot more clearly, providing better separation of concerns and higher cohesion. In short, you avoid the spaghetti that a lot of winforms applications can suffer from.
Below is the NavigationController that the AppDelegate class references.
public class NavigationController : UINavigationController
{
	HomeViewController _firstController;
	public override void ViewDidLoad()
	{
		_firstController = new HomeViewController();
		PushViewController(_firstController, true);
		base.ViewDidLoad();
	}
}
After this, you’re ready to add the first controller/view the UINavigationController displays. I put my definition all into one .cs file in the solution download, however it’s cleaner to create a folder called “Controllers” and place each separate controller into its own file.
public class HomeViewController : UIViewController
{
	public override void ViewDidLoad ()
	{
	}
}
Hitting run will display a navigation bar and a white view.
ViewDidLoad, ViewWillAppear, ViewDidAppear
If you’re confused about which overriden method the initialization code for your control (sorry - view) layout should go be in, read this small piece first.
| public class Level2ViewController : UIViewController | |
| { | |
| public override void ViewDidLoad() | |
| { | |
| Title = "Level 2"; | |
| UILabel label = new UILabel(); | |
| label.Text = "Level2ViewController"; | |
| label.Frame = new System.Drawing.RectangleF(100, 100, 100, 100); | |
| View.AddSubview(label); | |
| // A new toolbar with items | |
| UIBarButtonItem item = new UIBarButtonItem(); | |
| item.Title = "Another item"; | |
| item.Clicked += delegate(object sender, EventArgs e) | |
| { | |
| Level3ViewController controller = new Level3ViewController(); | |
| NavigationController.PushViewController(controller, true); | |
| }; | |
| ToolbarItems = new UIBarButtonItem[] { item }; | |
| base.ViewDidLoad(); | |
| } | |
| public override void ViewWillAppear(bool animated) | |
| { | |
| // Re-show the toolbar here for consistency | |
| NavigationController.SetToolbarHidden(false, true); | |
| base.ViewWillAppear(animated); | |
| } | |
| } |
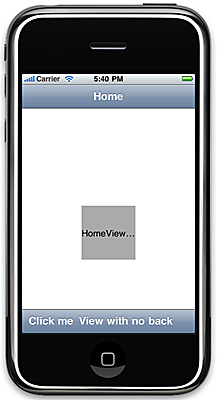
Adding controls (Views) to the first controller
I’ll stick to using the term “controls” to mean a label, button, textfield but as mentioned Apple defines these as Views. The code below demonstrates a basic label and 2 tool bar buttons on the first controller. It centers the three controls, and each button click Pushes, and therefore subsequently displays the next controller.
You get a toolbar and a navigation bar to hide or display as you wish with each controller inside the parent UINavigationController. The HomeViewController makes sure the toolbar is displayed in the ViewWillAppear method. The reason for this is the controller that the first button pushes hides the toolbar, so when the user hits back on that controller (and returns to the HomeViewController), the toolbar needs to be re-displayed.
| public class HomeViewController : UIViewController | |
| { | |
| public override void ViewDidLoad() | |
| { | |
| Title = "Home"; | |
| // A 'view' aka label control for this view | |
| UILabel label = new UILabel(); | |
| label.Text = "HomeViewController"; | |
| label.Frame = Center(100, 100); | |
| label.BackgroundColor = UIColor.LightGray; | |
| View.AddSubview(label); | |
| // 2 toolbar items | |
| UIBarButtonItem item1 = new UIBarButtonItem(); | |
| item1.Title = "Click me"; | |
| item1.Clicked += delegate(object sender, EventArgs e) | |
| { | |
| Level2ViewController controller = new Level2ViewController(); | |
| NavigationController.PushViewController(controller, true); | |
| }; | |
| UIBarButtonItem item2 = new UIBarButtonItem(); | |
| item2.Title = "View with no back"; | |
| item2.Clicked += delegate(object sender, EventArgs e) | |
| { | |
| ViewWithNoBackController controller = new ViewWithNoBackController(); | |
| NavigationController.PushViewController(controller, true); | |
| }; | |
| ToolbarItems = new UIBarButtonItem[] { item1, item2 }; | |
| base.ViewDidLoad(); | |
| } | |
| public override void ViewWillAppear(bool animated) | |
| { | |
| // Re-show the toolbar here for consistency | |
| NavigationController.SetToolbarHidden(false, true); | |
| base.ViewWillAppear(animated); | |
| } | |
| public RectangleF Center(float width, float height) | |
| { | |
| var rect = new RectangleF((View.Frame.Width / 2) - (width / 2), (View.Frame.Height / 2) - (height / 2), width, height); | |
| // Prints: | |
| // Rect: {X=110,Y=180,Width=100,Height=100} | |
| // Frame: {X=0,Y=20,Width=320,Height=460} | |
| Console.WriteLine("Rect: {0}", rect); | |
| Console.WriteLine("Frame: {0}", View.Frame); | |
| return rect; | |
| } | |
| } |
Animating NavigationController.PushViewController
For simple transition animations when pushing a new view, you can use UIView.BeginAnimation to achieve 4 different effects. This is fairly easy to do as illustrated below. For a wider range of animations, the CATransition class is the best option - described here.
// Make sure you push first or the Title doesn't get animated.
var controller = new MyController();
NavigationController.PushViewController(controller, false);
UIView.BeginAnimations(null,IntPtr.Zero);
UIView.SetAnimationDuration(1);    UIView.SetAnimationTransition(UIViewAnimationTransition.FlipFromLeft,NavigationController.View,true);
UIView.CommitAnimations();
If you want the animation to occur when the controller is popped/dissapears you will need to hide the back button and handle the click yourself (or any button you use to hide the current controller). This can be done with the roughly the same code:
UIView.BeginAnimations(null,IntPtr.Zero);
UIView.SetAnimationDuration(1);
UIView.SetAnimationTransition(UIViewAnimationTransition.FlipFromRight,NavigationController.View,true);
NavigationController.PopViewControllerAnimated(false);
UIView.CommitAnimations();
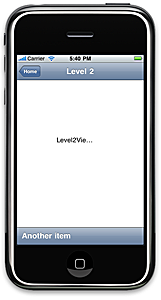
Replacing the toolbar
When you push a new controller, the toolbar is replaced. If you want the same toolbar to appear as the last controller, one solution is to derive your controllers from one base class that inherits from UIViewController, and then adds the toolbar in its ViewDidLoad method. Alternatively you may not want that toolbar to display again. The code below demonstrates adding a new toolbar item, which when clicked pushes another controller.
public class Level2ViewController : UIViewController
{
	public override void ViewDidLoad()
	{
		Title = "Level 2";
		UILabel label = new UILabel();
		label.Text = "Level2ViewController";
		label.Frame = new System.Drawing.RectangleF(100, 100, 100, 100);
		View.AddSubview(label);

		// A new toolbar with items
		UIBarButtonItem item = new UIBarButtonItem();
		item.Title = "Another item";
		item.Clicked += delegate(object sender, EventArgs e)
		{
			Level3ViewController controller = new Level3ViewController();
			NavigationController.PushViewController(controller, true);
		};

		ToolbarItems = new UIBarButtonItem[] { item };
		base.ViewDidLoad();
	}

	public override void ViewWillAppear(bool animated)
	{
		// Re-show the toolbar here for consistency
		NavigationController.SetToolbarHidden(false, true);
		base.ViewWillAppear(animated);
	}
}
Hiding the back button
The second button on the toolbar pushes a new controller, which demonstrates hiding the back button. Of course without the back button present the user can’t do anything except quit the application, but this is simply to demonstrate hiding it. You may want to hide the back button for an intermediate loading screen.
public class ViewWithNoBackController: UIViewController
{
	public override void ViewDidLoad ()
	{
		Title = "Settings";

		// The label again
		UILabel label = new UILabel();
		label.Text = "ViewWithNoBackController";
		label.Frame = new RectangleF(100,100,100,100);
		View.AddSubview(label);

		// Demonstrates hiding the back and toolbars.
		NavigationItem.SetHidesBackButton(true,true);
		NavigationController.SetToolbarHidden(true,true);
		base.ViewDidLoad ();
	}
}
If you want the animation to occur when the controller is popped/dissapears you will need to hide the back button and handle the click yourself (or any button you use to hide the current controller). This can be done with the roughly the same code:
UIView.BeginAnimations(null,IntPtr.Zero);
UIView.SetAnimationDuration(1);
UIView.SetAnimationTransition(UIViewAnimationTransition.FlipFromRight,NavigationController.View,true);
NavigationController.PopViewControllerAnimated(false);
UIView.CommitAnimations();
Replacing the toolbar
When you push a new controller, the toolbar is replaced. If you want the same toolbar to appear as the last controller, one solution is to derive your controllers from one base class that inherits from UIViewController, and then adds the toolbar in its ViewDidLoad method. Alternatively you may not want that toolbar to display again. The code below demonstrates adding a new toolbar item, which when clicked pushes another controller.
public class Level2ViewController : UIViewController
{
	public override void ViewDidLoad()
	{
		Title = "Level 2";
		UILabel label = new UILabel();
		label.Text = "Level2ViewController";
		label.Frame = new System.Drawing.RectangleF(100, 100, 100, 100);
		View.AddSubview(label);

		// A new toolbar with items
		UIBarButtonItem item = new UIBarButtonItem();
		item.Title = "Another item";
		item.Clicked += delegate(object sender, EventArgs e)
		{
			Level3ViewController controller = new Level3ViewController();
			NavigationController.PushViewController(controller, true);
		};

		ToolbarItems = new UIBarButtonItem[] { item };
		base.ViewDidLoad();
	}

	public override void ViewWillAppear(bool animated)
	{
		// Re-show the toolbar here for consistency
		NavigationController.SetToolbarHidden(false, true);
		base.ViewWillAppear(animated);
	}
}
Going straight to a controller in the stack
If the application has just started, or for any other reason you want to jump straight to the last controller in the chain (in my example, Level3ViewController) this can be achieved by manually creating the NavigationController.ViewControllers array.
using System.Linq;
public class NavigationController : UINavigationController
{
	public override void ViewDidLoad ()
	{
		var firstController = new HomeViewController();
		var secondController = new Level2ViewController();
		var thirdController = new Level3ViewController();
		var viewControllers = ViewControllers.ToList();
		viewControllers.Add(firstController);
		viewControllers.Add(secondController);
		viewControllers.Add(thirdController);
		ViewControllers = viewControllers.ToArray();
		base.ViewDidLoad ();
	}
}
Removing a controller from the stack
Removing a controller uses the same technique as above, but removing rather than adding. It maybe possible to remove the current one too e.g. RemoveAt(controllers.Length -1) however I haven’t tried this out.
public class Level3ViewController: UIViewController
{
	public override void ViewDidLoad ()
	{
		var controllers = NavigationController.ViewControllers.ToList();
		for (int i = 0; i < controllers.Count; i++)
		{
			if (controllers[i] is Level2ViewController)
			controllers.RemoveAt(i);
		}
		NavigationController.ViewControllers = controllers.ToArray();
	}
}

I'm Chris Small, a software engineer working in London. This is my tech blog. Find out more about me via Github, Stackoverflow, Resume