Monotouch tips and snippets
October 10, 2010
This page is full of discoveries and snippets I’m accruing as I slowly learn my way around Monotouch. Originally my plan was to write objective-C, but just as I had finished my first Objective-C book I heard Monotouch presentation at a Devdays conference.
Please note, many of the performance or speed related tips on this page are based around Monotouch 2.x and may no longer be relevant.
Monotouch XML documentation for Visual Studio
If you want to use Monotouch in Visual Studio, and want intellisense then stick this XML file in the same folder that your monotouch DLLs are.
It was generated and converted to XML format (Mono uses a different format for storing XML documentation in) using Monotouch 2, however most core classes are covered.
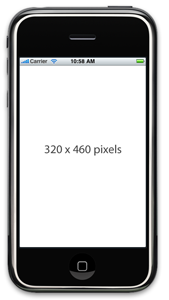
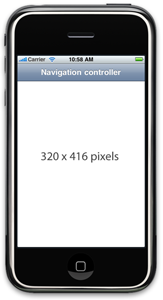
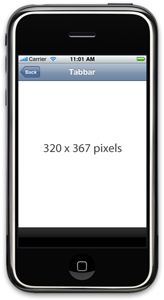
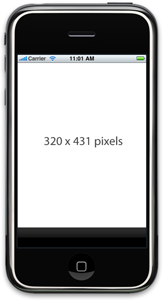
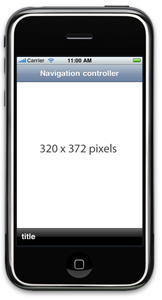
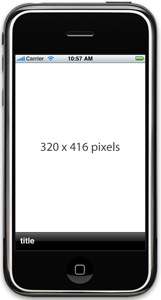
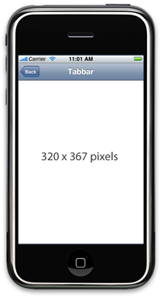
Available space/dimensions for the view
The graphics below are based on a solution file that writes the View.Bounds property to the screen.
The bottom bar with “title” is a UIToolBar, the plain black is a UITabBar.
Adding and querying calendar events with the event kit (EK*_*)
The example below is a small snippet based on the source of Flashback. It shows querying and adding calendar events
public void CalendarEvents()
{
	EKEventStore store = new EKEventStore();
	EKCalendar calendar = store.DefaultCalendarForNewEvents;
	// Query the event
	if (calendar != null)
	{
		// Searches for every event in the next year
		NSPredicate predicate = store.PredicateForEvents(NSDate.Now,DateTime.Now.AddDays(360),new EKCalendar[] {calendar});
		store.EnumerateEvents(predicate, delegate(EKEvent currentEvent, ref bool stop)
		{
			// Perform your check for an event type
		});

		// Add a new event
		EKEvent newEvent = EKEvent.FromStore(store);
		newEvent.Title = "Lunch at McDonalds";
		newEvent.Calendar = calendar;
		newEvent.StartDate = DateTime.Now.Today;
		newEvent.EndDate = DateTime.Now.Today.AddDays(1);
		newEvent.Availability = EKEventAvailability.Free;
		store.SaveEvent(newEvent, EKSpan.ThisEvent, new IntPtr());
	}
}
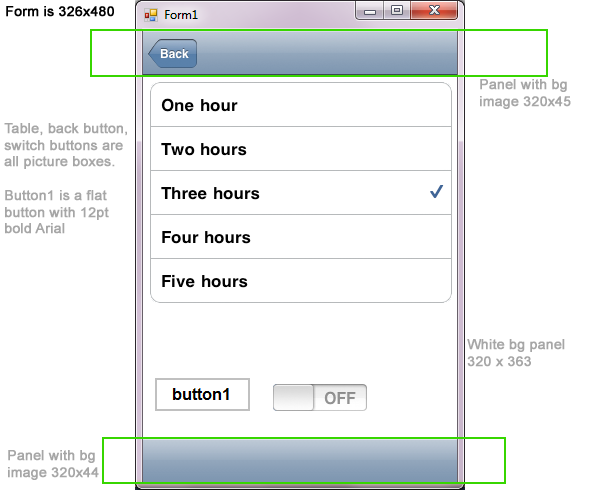
Mocking the UI in Visual Studio
It’s possibly to imitate the iPhone UI in Visual Studio using a cut up screenshot from the iPhone Simulator and some panels. Below shows how this can be down - it’s a mostly pointless exercise but can help to quickly layout views and get the coordinates if you working without XIBs. The project source for this can be found here.
Setting the application icon
Monodevelop for Monotouch makes this as easy as it is in Visual Studio, instead of the more convoluted way in XCode. Simply open the project properties:
![]()
The icons are automatically round-cornered by Cocoa, and should be a 57×57 png file.
Using selectors/the selector object and fading a view out
The snippet below is an example of registering your own custom selector, and also shows a method of fading out the current view into a new one, which could be used on a splashscreen. I got the selector code with the help of this question from stackoverflow.com
public override void ViewDidAppear(bool animated)
{
	base.ViewDidAppear (animated);
	// _imageView,_label,_activityView are all created in ViewDidLoad
	// Fade out view - you may need to put this inside its own thread
	UIView.BeginAnimations(null);
	UIView.SetAnimationDuration(0.5);
	UIView.SetAnimationTransition(UIViewAnimationTransition.None,_imageView,true);
	UIView.SetAnimationDelegate(this);
	UIView.SetAnimationDidStopSelector(new Selector("fadeOutDidFinish"));
	_imageView.Alpha = 0;
	_label.Alpha = 0;
	_activityView.Alpha = 0;
	UIView.CommitAnimations();
}

[Export("fadeOutDidFinish")]
public void FadeOutDidFinish()
{
	MyController newController = new MyController();
	View = newController.View;
}
Animating a View transition using UIView.BeginAnimations and CATransition
There’s two ways of performing a view transition animation: using the inbuilt UIView static methods, which limit you to a set of 4 animation styles (see the Apple docs). Below demonstrates using this with a UINavigationController, swap in the View you’re display if your not using a UINavigationController:
// Make sure you push before the animations, or the Title doesn't animate
var controller = new MyController();
NavigationController.PushViewController(controller, false);
UIView.BeginAnimations(null,IntPtr.Zero);
UIView.SetAnimationDuration(1); UIView.SetAnimationTransition(UIViewAnimationTransition.FlipFromLeft,NavigationController.View,true);
UIView.CommitAnimations();
The alternative is using CATransition, which gives you more flexibility. You are still limited to 4 types of animation, however there are infact more - but these are undocumented and probably won’t make it onto the appstore if you use them (the @ indicates it’s undocumented):
- kCATransitionFade
- kCATransitionPush
- kCATransitionMoveIn
- kCATransitionReveal
- @”suckEffect”
- @”spewEffect”
- @”genieEffect”
- @”unGenieEffect”
- @”rippleEffect”
- @”twist”
- @”tubey”
- @”swirl”
- @”charminUltra”
- @”zoomyIn”
- @”zoomyOut”
And the code is fairly similar. I haven’t figured out how to set the timing effect yet.
CATransition transition = new CATransition();
transition.Duration = 1;
transition.Type = "zoomyOut";
NavigationController.View.Layer.AddAnimation(transition,"mykey");
var controller = new MyController();
NavigationController.PushViewController(controller, false);
Gradient background on a UIButton / emulating UIGlassButton
UIGlassButton is an undocumented subclass of UIButton which is used throughout the iPhone, for example the “cancel” button when you power off the iPhone. It is possible to create an instance of this using Monotouch using new Class(“UIClass”) and copying some objective-C examples around, however if you app does this it will be rejected in the appstore.
The solution is to use a graphic background, and make it stretchable. Below is how to achieve this, and one graphic solution as a transparent PNG. It doesn’t have the same bevelling as the Apple buttons but does work on any background.

UIImage image = UIImage.FromFile("glassbutton.png");
image = loginImage.StretchableImage(9,0);

UIButton button = new UIButton(new RectangleF(0, 0, 250, 37));
button.SetBackgroundImage(image,UIControlState.Normal);
button.BackgroundColor = UIColor.Clear;
button.Font = UIFont.BoldSystemFontOfSize(20);
button.SetTitle("Cancel",UIControlState.Normal);
An example:

Update: Martin Bowling has a much neater solution with this glass button image generator (required Monotouch trial or full), which dumps the button as a transparent PNG with its title straight to a file:
UIAlertView example
The UIAlertView is the alert() or MessageBox.Show of the Cocoa world. It’s nice and flexible like the new modals you were given in Vista, and straight forward to use:
using MonoTouch.UIKit;
void ShowAlert()
{
	UIAlertView alert = new UIAlertView();
	alert.Title = "Are you sure?";
	alert.AddButton("Ok");
	alert.AddButton("Maybe");
	alert.AddButton("No");
	alert.Message = "This could explode the moon";
	alert.Delegate = new MyAlertViewDelegate();
	alert.Show();
}

public class MyAlertViewDelegate : UIAlertViewDelegate
{
	public override void Clicked (UIAlertView alertview, int buttonIndex)
	{
		// Don't call base or you'll get:
		// Unhandled Exception: MonoTouch.Foundation.You_Should_Not_Call_base_In_This_Method
	}
	public override void Canceled (UIAlertView alertView)
	{
		// Don't call base or you'll get:
		// Unhandled Exception: MonoTouch.Foundation.You_Should_Not_Call_base_In_This_Method
	}
}
Getting the bundle path
When Monotouch deploys your application for debugging, it will create a directory in
..Application Support/iPhone Simulator/User/Applications/{Guid}/
This is your application’s base directory. Everything is stored in a bundle, a type of zip file with all the resources and the app in. This monotouch page has all the information you need on the various directories in your application’s root directory. To access this you can to it with:
Environment.CurrentDirectory
and also available in:
NSBundle.MainBundle.ResourcePath
But CurrentDirectory is the better option. So for a build action ‘content’, you set your Sqlite connection string to:
var connection = string.Format("Data Source={0}/my.db;Version=3;",Environment.CurrentDirectory);
Only resources in your main application will be copied to the bundle. Referenced projects with content build actions are ignored.
Enabling the return key to hide the a keyboard with ResignFirstResponder
Here’s an example of adding support for a standard keyboard on a textfield, and making sure the return key hides the keyboard.
private UITextField _textField;
public override void ViewDidLoad()
{
	_textField = new UITextField();
	_textField.Text = "King Alfonso III";
	_textField.Bounds = bounds;
	_textField.Placeholder = "Username";
	_textField.ShouldReturn = delegate
	{
		_textField.ResignFirstResponder();
		return true;
	};

	View.AddSubview(_textField);
}
If you are submitted a form with a button, make sure you resign all the textfields responders in the button click, to avoid getting responder errors.
public void ButtonClick(object sender, EventArgs e)
{
	_textField.ResignFirstResponder();
	// All other textboxes
	// Other button logic
}
A Modal dialog helper
The class below displays a basic modal dialog with an “OK” button - where no response is necessary, for example if there is no internet connection you would want to warn about this. It also demonstrates a simple Yes/No.
public class ModalDialog
{
	public static void Alert(string title,string message)
	{
		UIAlertView alert = new UIAlertView();
		alert.Title = title;
		alert.AddButton("Ok");
		alert.Message = message;
		alert.Show();
	}

	public static void AskYesNo(string title,string message)
	{
		UIAlertView alert = new UIAlertView();
		alert.Title = title;
		alert.AddButton("Yes");
		alert.AddButton("No");
		alert.Message = message;
		alert.Delegate = new MyAlertViewDelegate();
		alert.Show();
	}

	public class MyAlertViewDelegate : UIAlertViewDelegate
	{
		public override void Clicked (UIAlertView alertview, int buttonIndex)
		{
		// Don't call base or you'll get:
		// Unhandled Exception: MonoTouch.Foundation.You_Should_Not_Call_base_In_This_Method
		}

		public override void Canceled (UIAlertView alertView)
		{
		// Don't call base or you'll get:
		// Unhandled Exception: MonoTouch.Foundation.You_Should_Not_Call_base_In_This_Method
		}
	}
}
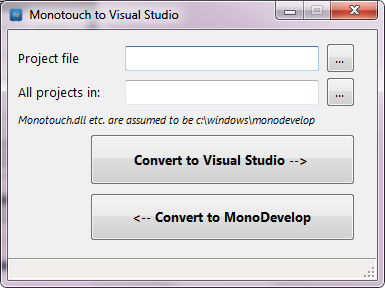
Using a monotouch project in Visual Studio 2008/2010
Update
There’s now this Github project to automate going between Visual Studio and Monodevelop.
The steps below assume you have a shared drive that you keep your Monotouch/Monodevelop project files on. It can become tedious performing these steps each time you switch between Mac and PC. So a program to sync the two would be useful. ManniAT has written one that does a one-way convert. I’ve written a very simplistic one also. The download is a Visual Studio Project file:
1.
First of all, copy all your monotouch assemblies from your Mac to a path on your windows machine (or a shared drive). My preferred easy to remember location is C:windowsmonotouch.
2.
Backup your monotouch csproj file
3.
Edit it in notepad++ or similar. Change this line:
{95D28B03-E797-42C2-B5C6-B19D8C3D6670}
to
{25B16A36-324E-4DB2-BCE9-85DF33504CD3}
(This new GUID is a standard console application.)
4.
Remove the
5.
Change all
6.
Add a project references folder to point to your monotouch folder in the project properties pane. You can’t add the dlls to the GAC as they’re not strongly signed. Visual Studio stores this folder in a “.csproj.user” file. Unfortunately you have to do this for every project you have.
7.
For Visual Studio 2010:
Change the
The project file infact still works with Visual Studio 2008 with ToolsVersion=”4.0″ as long as there is no solution file. Visual Studio looks for a solution file in the parent directory to figure out what version the project is.
One thing you can do with Visual Studio 2010 is upgrade the projects to client profile 4.0, and remove System.dll from your Windows monotouch folder - it will default to the one in the GAC for the profile. Just be weary not to use .NET 4.0 features such as named parameters, dynamic and code contracts. Also the line
v4.0
needs to be changed back to
v3.5
to work correctly in MonoDevelop.
Monotouch documentation inside Visual Studio
Once you’ve got your Monotouch projects working in Visual Studio you will want to benefit from inline documentation (tooltips) for your intellisense. Mono has its own XML format for its assemblies, so you can’t simply copy across the XML files to get documentation working in Visual Studio. I would distribute the Visual Studio XML file, however this is copyrighted by Apple. The Mono XML files are generated when Monotouch is installed to get around this. To convert to the Visual Studio format just follow the steps below:
-
Copy the XML folder from your Mac to your windows hard drive: “C:monodocs”
-
Edit the index.xml file in “c:monodocsenindex.xml”
-
Remove the
line (there’s no docs for it so it errors), and also AlphaAttribute -
Save the file
-
Install Mono for windows (or you can perform the steps below on your mac in your /Developer/Monotouch folder)
-
Open a command line to “C:Program FilesMono-2.6.1bin”
-
Type mdoc export-msxdoc “C:/monodocs/en” into the console (see here for more details.)
-` C:Program FilesMono-2.6.1bin will now have three new xml files:- monotouch.xml
- NamespaceSummaries.xml
- OpenTK.xml
-
Copy monotouch.xml and the others to your lib folder, or wherever you reference monotouch.dll from.
Visual Studio should now have inline comments as tooltips.
Monotouch SqliteParameter and guids
If you read the SqliteParameter documentation you will notice lots of red documentation missing links. If you’ve used Open Source products much this is fairly standard (even though for Monotouch you are paying hundreds of dollars for the product). My own viewpoint on it is why bother making something open source if you can’t be bothered to write the docs, all but a dozen developers usually care about your finally crafted 3GL code unless you write in detail what you’ve done.
That’s a separate rant however, and actually the Monotouch code is well documented, it’s mainly the root Mono code that isn’t.
For Mono.Data.SqliteParameter you are required to enter a DbType for your paramater. SqliteParameter is the best way of performing inserts, updates or queries that require unparsed field types - mostly strings.
After examining the source to Mono.Data.Sqlite I discovered that VARCHAR, TEXT maps to the String DbType. And for Guid I was getting some strange data being entered for my INSERTS using DbType.Guid. I managed to get around this problem by using a String instead and using Guid.ToString().
One other gotcha will be if you try to return an int from a count() statement. This actually returns a long, so assuming it’s an int will cause a casting exception.
Saving user settings in Monotouch using NSUserDefaults
There’s a few ways you can save your user settings on the iPhone, but the fastest way is using the NSUserDefaults object.
This writes to a file in your app bundle called info.plist which is a file Monotouch automatically generates for you. NSUserDefaults has a lot of useful helper methods already built in, as well as synchronisation between what it has and what you have, and a facility for defaults.
It’s based on using a Dictionary with a key and value, but isn’t restricted to one type - there’s SetInt, SetString. Below is a small example of writing a Settings class.
public class Settings
{
	public static string Name { get;set; }
	public static int MagicNumber { get;set; }

	public static void Read()
	{
		Name = NSUserDefaults.StandardUserDefaults.StringForKey("name");
		MagicNumber = NSUserDefaults.StandardUserDefaults.IntForKey("magicnumber");
	}

	public static void Write()
	{
		NSUserDefaults.StandardUserDefaults.SetString(Name,"name");
		NSUserDefaults.StandardUserDefaults.SetInt(MagicNumber,"magicnumber");
		NSUserDefaults.StandardUserDefaults.Synchronize();
	}
}
And inside your AppDelegate class:
public override bool FinishedLaunching (UIApplication app, NSDictionary options)
{
	// If you have defined a view, add it here:
	// window.AddSubview (navigationController.View);
	Settings.Read();
	window.MakeKeyAndVisible ();
	return true;
}
public override void WillTerminate (UIApplication application)
{
	Settings.Write();
}
The famous object file format invalid or unsuitable error in Monotouch
If you’re using this guide to sign your app with a provisioning license (adhoc) you can get an ‘object file format invalid or unsuitable’ error for lots of different reasons.
The most obvious one is you’ve entered the entire bundle identifier, instead of just the “com.mysite.iphonapp” part.
But one issue I got for 5 hours of repeated building (3 minutes a build on Mac Mini) and tinkering with every project setting was my assembly name.
If your assembly name has a dot in the name it won’t sign.For example “MyApp.UI” will not work. I also make sure it’s explicitly set in the project configuration.
Another useful thing to help out is the “Build Output” window from the view menu. If it’s not on my default, enable it to see the build taking place as the progress bar often stalls at ‘Compiling to native code’.
Getting around “background-attachment:fixed” in mobile Safari on the iPhone
Because of the way the viewport is scaled and drawn in the mobile version of Safari, you aren’t able to use the CSS “background-attachment: fixed” style to keep the background image in a fixed place. The way around this is to use a UIImageView behind a UIWebView and set the webview to opaque, shown below:
UIImageView imageView = new UIImageView();
imageView.Image = UIImage.FromFile("backgroundimage.png");
imageView.Frame = new RectangleF(0,0,320,480);
View.AddSubview(imageView);

UIWebView webView = new UIWebView();
webView.BackgroundColor = UIColor.Clear;
webView.Opaque = false;
webView.Frame = new RectangleF(0, 0, 320, 480);
webView.LoadHtmlString("<html>your html</html>", new NSUrl("/"));

View.AddSubview(webView);
View.BringSubviewToFront(webView);
Redirecting links to Safari in a UIWebView
This fairly straight forward to do using the Delegate property the UIWebView gives you.
public override void ViewDidLoad ()
{
	var webView = new UIWebView();
	webView.Delegate = new WebDelegate();
	View.AddSubview(webView);
}
/// <summary>
/// Handles all links clicked in the webview, and directs them to Safari.
/// </summary>
public class WebDelegate : UIWebViewDelegate
{
	public override bool ShouldStartLoad (UIWebView webView, NSUrlRequest request, UIWebViewNavigationType navigationType)
	{
		if (navigationType == UIWebViewNavigationType.LinkClicked)
		{
			UIApplication.SharedApplication.OpenUrl(request.Url);
			return false;
		}
		else
		{
			return true;
		}
	}
}
Hyperlink UIButton or underlined text in a UIButton
This snippet is taken from an Objective-C source on Stackoverflow.com. It can serve as an equivalent to the hyperlink button or link button as you’d find in ASP.NET/Winforms/WPF.
public class UnderlineButton : UIButton
{
	public override void Draw (RectangleF rect)
	{
		base.Draw (rect);
		// Red underline
		CGContext context = UIGraphics.GetCurrentContext();
		context.SetRGBFillColor(0xFF,0xFF,0,1);
		context.SetLineWidth(1);
		context.MoveTo(0,rect.Height -5);
		context.AddLineToPoint(rect.Width,rect.Height -5);
		context.StrokePath();
	}
}
Hiding the tab bar in a UITabBarController
This can be achieved by adding two methods to your parent TabBarController:
public void ShowTabBar()
{
	// SubView1 is the TabBar
	View.Subviews[1].Hidden = false;
}

public void HideTabBar()
{
	View.Subviews[1].Hidden = true;
}
The first subview is the view it’s displaying, the second is the tabbar itself. You may need to alter the index for this based on your app.
And then inside your controllers, you can show or hide the bar:
public override void ViewDidAppear (bool animated)
{
	// Renable the bottom tab bar
	base.ViewDidAppear (animated);

	// tabBarController is passed in using 'this' in the ctor
	_tabBarController.ShowTabBar();
}

public override void ViewDidLoad ()
{
	base.ViewDidLoad ();

	// tabBarController is passed in using 'this' in the ctor
	_tabBarController.HideTabBar();
}
The major issue with hiding your tabbar is your view is limited in height to the where the tabbar would be. So if you want to replace it with a toolbar, a toolbar is not as high (30px) which means you have to force a taller toolbar. At this height it looks wrong and probably won’t meet the Apple HIG anyway.
ViewDidLoad vs ViewDidAppear vs ViewWillAppear
This question asks the difference between the three overriden methods in classes that derive from UIViewController. Eduardo Scoz gives this nice concise answer which I’m “re-printing” here:
-
ViewDidLoad - Whenever I’m adding controls to a view that should appear together with the view, right away, I put it in the ViewDidLoad method. Basically this method is called whenever the view was loaded into memory. So for example, if my view is a form with 3 labels, I would add the labels here; the view will never exist without those forms.
-
ViewWillAppear: I use ViewWillAppear usually just to update the data on the form. So, for the example above, I would use this to actually load the data from my domain into the form. Creation of UIViews is fairly expensive, and you should avoid as much as possible doing that on the ViewWillAppear method, becuase when this gets called, it means that the iPhone is already ready to show the UIView to the user, and anything heavy you do here will impact performance in a very visible manner (like animations being delayed, etc).
-
ViewDidAppear: Finally, I use the ViewDidAppear to start off new threads to things that would take a long time to execute, like for example doing a webservice call to get extra data for the form above.The good thing is that because the view already exists and is being displayed to the user, you can show a nice “Waiting” message to the user while you get the data.
There are other tricks you can use, though. Lets say you want a UILabel to “fly” into the form after the form is loaded. In that case, I would add the label to the form in the ViewDidLoad but with a Frame outside of the view area, and then in the ViewDidAppear I would do the animation to fly it back into view.
Checking for an internet connection with a timed out Reachability
Miguel De Icaza’s port of Apple’s Reachability class allows you to check for various states of your iPhone’s connection. Apple’s original Reachability and subsequently the API Miguel’s port is calling is quite well known to be badly implemented (Miguel has said this himself on the monotouch forums).
One problem I frequently get with the Reachability class is it can hang on the device when trying to get the WWAN status (internet connection on 3G). A solution to this is to make the call inside a thread, and join it after 2 seconds. The code below demonstrates doing this.
Update: I’ve discovered since writing this that calling Reachability.InternetConnectionStatus() != NetworkStatus.NotReachable; yields the result a lot faster. Also having the device connected via USB and using Wifi has caused some unpredictable results.
/// <summary>
/// Returns true if the device has an internet connection.
/// </summary>
public bool IsOnline()
{
	ReachabilityStatus status = new ReachabilityStatus();
	Thread thread = new Thread(ThreadedIsOnline);
	thread.IsBackground = true;
	thread.Start(status);
	bool terminated = thread.Join(2000);
	return terminated && status.IsOnline;
}

private void ThreadedIsOnline(object state)
{
	using (NSAutoreleasePool pool = new NSAutoreleasePool())
	{
		((ReachabilityStatus)state).IsOnline = Reachability.RemoteHostStatus() != NetworkStatus.NotReachable;
	}
}

private class ReachabilityStatus
{
	public bool IsOnline;
}
Masking the startup time of Monotouch
When you build a Monotouch application with a provisioning license (whether for the appstore or not), the startup time is generally around 1-2 seconds. The Monotouch team are working on this, however as a stop gap solution a splash screen prevents your users seeing the black screen while it loads, and instead the splash screen launches instantly.
This is easy to do, you just put a 320×480 pixel PNG file in the root of your project directory, and call it Default.png (the name is case sensitive). Change the build method of the file to “Content” and this the graphic will then appear instantly, while the application loads.
One thing to note, as pointed out by Geoff Norton - the startup time depends on what your application is doing. Monotouch can in some cases be faster than an objective-C equivalent.
SQlite performance in Monotouch
Using NHibernate, ASP.NET, SQL Server and servers with specs that make the iPhone tremble I’ve discovered the hard way a few SQLite speed up tips.
Don’t use Guid primary keys.
It’s the advice for every DBMS however in SQLite you really do see a massive difference. My app went from 6 seconds loading to 0.8 when I removed the Guid primary key.
Add an artificial integer autoincrement primary key
If the sort order of your table isn’t important, and you are using Guids for the ids, it’s worth adding an integer primary key. Your data is then ordered by an integer (rather than it guessing a column), which are fast in SQlite.
Lazy load data
1500 DateTime parses take around 200ms to create in Monotouch on the iPhone - compare that to a standard dual core desktop PC where I got around 8ms. So if you have large amounts of data it’s a big bottleneck. The load times are a lot slower for non-integer values such as DateTimes and Strings. Storing DateTimes as ticks and an INTEGER column may increase this slightly, however for Strings I found lazy loading decreased the response times quite dramatically.
Don’t use joins
This is a mantra repeated in other articles about SQLite performance.
Cache your data
As you Lazy Load, keep your objects in memory with a simple Cache system. Providing you aren’t storing the kind of data that will give your app an out of memory warning, the time it takes to run out of memory from caching SQLite data will almost always be longer than the time the user spends using the app.
The cache doesn’t need to be complicated, something simple like Cache
Consider a different datastore for static data
If you have data that isn’t user generated, and is readonly, I found it’s a lot faster to simply serialize the objects with a binary formatter rather than using SQLite. The obvious setback with this is finding an easy way to edit the data quickly, as SQLite has a number of good manager tools such as SQLitebrowser (Java, cross-platform and lightweight).
Transparent background with a UIWebView
I take none of the credit for the code below, it’s simply a conversion of the Objective-C from this blog post. This example sets the background color of the view the striped gray appearance you get with UITableViews.
public override void ViewDidLoad()
{
	View.BackgroundColor = UIColor.GroupTableViewBackgroundColor;
	_webView = new UIWebView();
	_webView.Frame = new RectangleF(0, 0, 320, 480);
	_webView.LoadHtmlString("<html><body style='background-color:transparent'>test</body></html>', new NSUrl("/"));
	_webView.BackgroundColor = UIColor.Clear;
	_webView.Opaque = false;
}
Modal loading UIView dialog
On the iPhone there is an example of a modal “loading” dialog when you set the wallpaper from one of your images. There are a few examples of doing this in objective-C around, however an easier solution is simply subclass UIAlertView as shown below. Note that the measurements are fairly esoteric in the example, and may need adjusting if you have a lot more or less text.
/// <summary>
/// Solution taken from: http://iphonedevelopertips.com/user-interface/uialertview-without-buttons-please-wait-dialog.html
/// </summary>
public class LoadingView : UIAlertView
{
	private UIActivityIndicatorView _activityView;
	public void Show(string title)
	{
		Title = title;
		Show();
		// Spinner - add after Show() or we have no Bounds.
		_activityView = new UIActivityIndicatorView(UIActivityIndicatorViewStyle.WhiteLarge);
		_activityView.Frame = new RectangleF((Bounds.Width / 2) - 15, Bounds.Height - 50, 30, 30);
		_activityView.StartAnimating();
		AddSubview(_activityView);
	}
	public void Hide()
	{
		DismissWithClickedButtonIndex(0, true);
	}
}
Converting to or from a DateTime to NSDate
This isn’t my code, but saved from a pastie.org post:
public static DateTime NSDateToDateTime(MonoTouch.Foundation.NSDate date)
{
	return (new DateTime(2001,1,1,0,0,0)).AddSeconds(date.SecondsSinceReferenceDate);
}

public static MonoTouch.Foundation.NSDate DateTimeToNSDate(DateTime date)
{
	return MonoTouch.Foundation.NSDate.FromTimeIntervalSinceReferenceDate((date-(new DateTime(2001,1,1,0,0,0))).TotalSeconds);
}
Using a Windows keyboard on Mac OS X
As a Windows .NET developer I use Windows and Visual Studio 99% of the time. I also use a British keyboard. One of the frustrations of moving to Mac OS X and not having an Apple keyboard is the key mappings.
Fortunately with a Microsoft keyboard it’s quite easy to get the keyboard to behave like a Windows keyboard. It involves 4 steps:
- Download the Microsoft keyboard software for Mac OS X and install it.
- As a British keyboard user - set your keyboard to “British - Microsoft”. This will fix your @, ” and other keys.
- Change your CTRL and Win keys around in the keyboard modifiers menu in the system preferences. CTRL+S, O now do what you’re used to, along with CTRL+Z/C/P.
- Add a key bindings file to sort out the HOME/END keys which go to the top of the page by default. This blog post tells you how to do, it’s just a matter of creating a textfile:
~/Library/KeyBindings/DefaultKeyBinding.dict
Add the following to the file, and restart and any applications you want to use the key bindings in:
{
"\UF72C"  = "pageUp:";
"\UF72D"  = "pageDown:";
"\UF729"  = "moveToBeginningOfLine:";
"\UF72B"  = "moveToEndOfLine:";
"$\UF729" = "moveToBeginningOfLineAndModifySelection:";
"$\UF72B" = "moveToEndOfLineAndModifySelection:";
}
Not all keys will be correct - for example you’ll need to use CTRL+TAB to ‘alt tab’ around, but it’s close enough.
Resources
Below is a small list of sites that have lots of info on Monotouch
- Alex York’s blog
- Craig Dunn’s blog
- ChrisNtr’s site
- Mike Bluestein’s blog
- codesnack screencasts
- Monotouch.info
- Monotouch’s current bug list
- The monotouch.net runtime forum
- Stackoverflow
- Delicious
As the Monotouch library matches Cocoatouch down to the classname, you can often just look for what you’re after in Objective-C/X-Code and translate it.

I'm Chris Small, a software engineer working in London. This is my tech blog. Find out more about me via Github, Stackoverflow, Resume