Using Team City for staging and test builds with ASP.NET and Selenium
March 06, 2012
I’ve been meaning to write this up for a while, to share my ongoing experience with using Team City for our build, test and staging server, but I’ve only finally got round to writing something up.
I stumbled upon Team City in 2011, after looking around for an alternative to Team Foundation Server’s Build server, which wasn’t working well with Selenium tests. It’s amazing that the product is free for up to 20 or so projects given how polished it is. My workplace doesn’t have a huge test coverage setup, mostly down to time constraints (if you want an example of huge test coverage, check out the Team City build server, with over 5000 CI tests running), but the prime motive for using Team City is to automate:
- Builds via check ins/commits from TFS (manual or continuous integration)
- Run all unit tests
- Run all Selenium unit tests
- Deploy to an IIS staging server
- Not screw everything up if 1-4 goes wrong, rollback in other words.
- All the above, but for a production environment with load balanced servers/web gardens.
So this blog post runs through how I went about doing this, as there are different ways of setting up step 3 and 4.
A few Team City Server tips to start
- If using TFS, create a seperate login for all Team City TFS operations, or preferably a login for all build operations such as file copies.
- Switch to SQL server at the start so your backups are a bit easier. You still need to use the backup tool for your projects and build steps - these aren’t stored in the database(!)
- Install Visual Studio 2010 on the server, for the builds. This by far the easiest option if you’re an msbuild newbie like me.
- Install SQL Server express on the server (for the Selenium tests)
- Install the web deploy tool (see below).
SQL Server setup with Team City
The documentation for using SQL Server with Team City is fairly comprehensive, there are a few bits of information that it misses out. The first is where to place your database.properties - this should live in something like “C:Usersteamcity.BuildServerconfig”, where teamcity is a user I’ve created on the domain, specifically for accessing TFS and accessing the network.
The other thing you might forget is to unzip your JTDS JDBC jar file - it needs the jar file from the zip file to be placed in “C:Usersteamcity.BuildServerlibjdbc”, or equivalent.
Getting start with TFS and Team City Server
Once your server is setup, your first step is to configure TFS. Obviously I’m assuming you’re using TFS, but other source control systems will work in just the same way as this step doesn’t do anything specific for TFS.
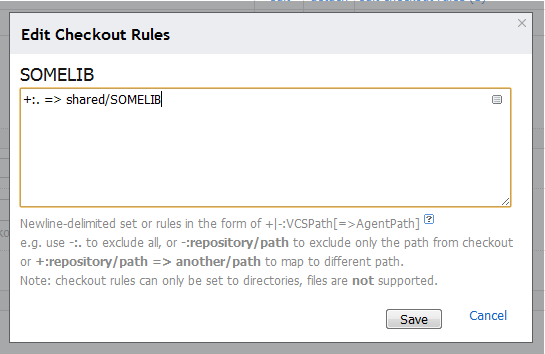
If you have multiple projects in TFS you may want to keep these in an “external” or “shared” folder, in which case you need to enter a custom checkout rule for their location:
Add #NUNIT to the release and/or staging build for your test project, and add the following to the top of each of your unit test source code files. This code chunk switches between Microsoft Tests and NUnit if #NUNIT exists.
#if NUNIT
using NUnit.Framework;
using TestClass = NUnit.Framework.TestFixtureAttribute;
using TestMethod = NUnit.Framework.TestAttribute;
using TestInitialize = NUnit.Framework.SetUpAttribute;
using TestCleanup = NUnit.Framework.TearDownAttribute;
using IgnoreAttribute = NUnit.Framework.IgnoreAttribute;
#else
using Microsoft.VisualStudio.TestTools.UnitTesting;
using IgnoreAttribute = Microsoft.VisualStudio.TestTools.UnitTesting.IgnoreAttribute;
#endif
You can then configure your Staging/Release builds to define #NUNIT in their configuration.
Setting up a new Team City project
Team City will guide you through creating a new project using its wizard, the first of the steps is the name followed by the source control setup. Once you’ve done this, hit save and start with the build steps.
I create 5 build steps, 4 of which you will need and the last is my strange way of creating fresh data installations on the staging environment database, if they’re needed.
Step 1 - Compile
The runner type for this shold be “Visual Studio (sln)”, and the solution path should simply be your solution, e.g. “roadkill.sln”.
The configuration should be “Staging”, if you have this configuration setup. Ideally you should have a configuration per deployment scenario - I use Debug, Staging, Release. I stick with “Rebuild” for the targets.
Step 2 - Selenium tests
This step runs NUnit, which in turn uses Selenium for running web tests. The setup I’m using with Selenium is to have a completely different solution for the web tests, with each [Test] completely tearing down the database and recreating it each time, to ensure no anomolies occur from old data.
This is not a good thing to do if others are using the staging server, so I tend to have to project configurations - one that runs Selenium tests using IIS and SQL Server on the Team City server, and another configuration that simply deploys to the staging environment.
You can enable the 1st to trigger the second if it succeeds.
All the attempts I’ve made to get Selenium to work on a Windows 2008 server have so far failed, so I’ve resigned myself to using a 2nd machine for the tests, which runs Windows 7 and has a Team City agent installed. This box obviously needs Visual Studio on it, SQL Server and IIS.
You may also be wondering about the preference for NUNit over MSTest - this is purely because I couldn’t get MSTest to behave with Team City, and found NUnit ran the tests perfectly. It does mean your tests have a huge #IF NUNIT header which is a pain in the behind, however they run without any problems like this.
The settings I use for Selenium are:
Runner type - NUNit, 2.5.10
.NET Runtime - auto(MSIL)/4.0
Run test from: %teamcity.build.checkoutDir%\roadkill.selenium\roadkill.selenium\bin\release\roadkill.selenium.dll
Step 3 - MS Build and web.config transforms
This is the msdeploy.exe step, which will take your compile output, and transform the web.configs aka perform a publish according to the configuration you specify (e.g. Staging).
The runner type should be “Command line”, executable with parameters.
The command executable is “%DotNetFramework4.0x86Path%msbuild.exe” (or a path to another .NET version)
The command parameters I use are
/p:Configuration=Staging;DeployOnBuild=True;PackageAsSingleFile=False;AutoParameterizationWebConfigConnectionStrings=
This will not produce a package file, but rather the entire directory structure. MSdeploy places its output inside the objStagingPackage folder in the Team City work directory for your project (a unique id). This output is then used in the next step.
Step 4 - Web deploy
This step performs the copy from the Team City server to the web server directory for your site.
The runner type should be “Command line”, custom script.
"C:\Program Files (x86)\IIS\Microsoft Web Deploy V2\msdeploy.exe" -verb:sync -source:contentPath="%system.teamcity.build.checkoutDir%\roadkill.site\obj\Staging\Package\PackageTmp\" -dest:contentPath="\\MYSTAGINGSERVER01\web\roadkill\deployedsite"
You will need Microsoft Web Deploy 2 installed on your server for this, which you can get from http://www.microsoft.com/download/en/details.aspx?id=25230 .
The site structure I’m using for the staging site is c:\web\roadkill\deployedsite.
Step 5 - Reinstall the database
As I mentioned up the top, this step is born mostly from doing things on a shoestring, where Redgate tools could perform the task for me. The steps uses WGET for windows (I opted against Powershell) to call a URL which re-creates the data. This url is only part of the MSDeploy publish for the debug and staging builds.
It’s a command line runner, whichs uses WGET as the exe and something like “http://roadkill.staging/reinstall/”, which returns JSON.
In these installer files in release mode, you can either add an #IF DEBUG to the controller Action, if you’re lucky enough to be using MVC. For plain ASP.NET you can add a few lines to the .csproj file:
<ItemGroup Condition="'$(Configuration)'=='Release' ">
	<ExcludeFromPackageFiles Include="ReInstall.aspx" />
	<ExcludeFromPackageFiles Include="MyInstallService.asmx" />
</ItemGroup>
You may get the icon for these files appearing twice in your solution explorer window.
A small aside about Webdeploy, clustered servers, FTP
One big issue I’ve come against with the Microsoft Web deploy tool is its lack of support for FTP and clustered IIS servers (web gardens, or web farms). I assume Microsoft are using the tool for their servers, but aren’t sharing their additinoal tools to the public.
The web deploy tool is capable of performing package based deployments, but at the expense of opening up ports on your server, and doesn’t allow you to target a specific server from a set of servers as far as I know. My solution to this problem has been to build a web-based REST based interface which allows each server to be targetted and brought out of rotation. This REST api performs a specific set of tasks for each deployment (remove from rotation, backup the existing site, perform a remote msdeploy using an FTP’d zip file).

I'm Chris Small, a software engineer working in London. This is my tech blog. Find out more about me via Github, Stackoverflow, Resume